Cabinet Painting Sacramento is an exciting, affordable project that can transform your kitchen. However, it’s essential that the preparation steps are taken seriously to ensure that your paint job looks and lasts.
The first step is to clean the surfaces thoroughly with Krud Kutter or TSP. This will remove any grease, dirt or grime to help the primer and paint adhere properly.
A fresh coat of paint on cabinets can significantly improve the look of a kitchen. It can also increase the value of your home, especially if you plan to sell it in the future. However, the process can be messy and time consuming, so it’s important to have the right tools for the job.
Having the proper tools will ensure that your cabinet painting project goes smoothly. Some of the most essential tools for this type of project include:
Screwdriver or drill: You will need one of these to remove the doors and drawers from their hinges. This will make it easier to clean the surfaces and to paint them. Ziploc bags: Use these to store the hinges and hardware in order to keep them organized when re-installing the cabinets. Masking tape: This will help protect adjoining surfaces from the inevitable splashes and splatters of paint. Paper, plastic film and/or tape: This will be used to cover any other areas that you don’t want to paint.
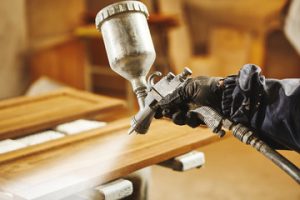
Rollers and sprayers: These are more efficient and provide a better finish than brushes. They are best suited for larger surface areas such as the fronts of the cabinet boxes and doors. They can be used alone or paired with a brush for touch-ups and details.
Brushes: While it may seem counterintuitive, a good brush is essential for achieving a high-quality paint job. It’s the perfect tool for reaching corners and crevices. It can also be used for touch-ups after the main painting is complete, ensuring that all areas are thoroughly covered.
Sandpaper: It’s important to sand the cabinets prior to applying primer and paint, as it will create a smooth, even base that will adhere to the existing surface. This will prevent flaking or peeling over time.
Expert wood refinishers know that proper prep work is the key to a successful cabinet painting project. They will thoroughly clean the cabinets to ensure that they are free of grease, dirt and other residues that can inhibit adhesion. They will also sand the surfaces of the cabinets to create a smooth, even base for the new coating.
Preparation
Cabinet painting is a great way to give your kitchen a face-lift without spending the money to replace them. The key to a good paint job is proper surface preparation. If you skip this step, the cabinets won’t adhere and your new paint will crack and peel quickly. To avoid this, start by cleaning the cabinet doors and boxes thoroughly with a degreaser or heavy duty cleaner. This will remove any dirt and grease that may be causing the adhesive problems. Then, sand the surface of the cabinets. This will help create a smooth, even surface for the primer and paint.
After you’ve sanded the surfaces, be sure to wipe them down with a damp cloth to remove any dust or debris that remains. This will also help the surfaces to dry completely before you paint them.
You should also cover any appliances or countertops that you don’t want to get paint on. This will protect them from drips and make it easy to clean up any messes. Finally, cover the floor with a tarp or paper to keep paint from splattering on it.
If you’re unsure about how to prepare your cabinets for painting, consult a professional cabinet painter for assistance. They will be able to walk you through the process and help you achieve a beautiful result.
While it may seem tempting to skip the removal of the cabinet doors and hardware, this is a necessary step in order to achieve an even and smooth finish. It will also make it much easier to paint the box of the cabinet. Once the doors are removed, be sure to mark each one with a number so you know where it goes back when you’re done.
If you’re unable to remove the doors, be sure to mask the edges of the cabinet boxes with tape. This will prevent the new paint from bleeding into the existing wood. Once the masking is in place, be sure to use a quality primer to ensure that your new coat of paint will stick and last.
Painting
Cabinet painting is an affordable way to update the style of your kitchen or bathroom without a total makeover. It can also be a great DIY project to take on, but it is important to know what you are doing before you tackle this project.
First, you will need to clean the cabinets thoroughly. Cabinets are constantly in use, and this wear and tear can cause them to collect grease, dust, dirt and other debris over time. Using a degreaser or liquid cleaner can help to remove this buildup and prepare the surface for painting. Once your cabinets are completely clean, you will need to sand the surfaces lightly. This will help the primer and paint to adhere to the surface and prevent chipping over time.
After the sanding is complete, you will need to clean the cabinet again and allow them to dry. It is a good idea to place them in a well ventilated area, and cover your floors with tarps or paper to protect them from any drips or overspray that may occur during the process. It is also a good idea to have a few folding tables or 5 gallon paint buckets set up as your work stations, to help keep everything organized and easy to manage.
When you are ready to start the actual painting, it is important to use high-quality paint. You will want to choose a cabinet paint that is designed to withstand the wear and tear of a busy kitchen. This type of paint will have more resins and is often formulated to be more resistant to staining, scratching and chipping than wall paint.
Once the paint is applied, you will need to let it dry for a few days before reattaching the doors and hardware. It is important not to touch or slam the doors, as the paint needs to fully cure to a hard and durable surface.
If you are not confident in your abilities to complete this DIY project, or if you do not have a lot of extra time on your hands, you may want to consider hiring a professional. They can provide you with a beautiful and professional looking finish that will last for years to come.
Finishing
Cabinet painting is a time-consuming project that requires thorough prep, attention to detail, and proper technique. But with the right tools, knowledge, and patience, your cabinets will look like new.
Begin by removing all the hardware from the cabinet doors. Place the screws, hinges, and other small parts in a safe location to prevent loss. Next, lightly sand the cabinet surfaces. This will scuff up the glossy finish and create a rough surface for primer and paint to adhere to. Use a hand-held electric sander for larger areas, and a sanding block or sandpaper for smaller areas and corners. Once the sanding is complete, thoroughly clean all surfaces using a damp rag or shop vac to remove any heavy dust.
Next, apply a coat of primer to all surfaces that are to be painted. This will help ensure that the new paint adheres properly to the existing surface and will also cover any stains that are not covered by the cabinet’s stain color. After the primer has fully dried, you can begin painting. There are many different ways to paint cabinetry, including brushes, rollers, and sprayers. Each method has its own set of benefits and drawbacks, so choose the one that best suits your skill level and preferences. When using a brush, be sure to work in thin coats and to let the previous coat dry completely before applying the next. If you’re using a roller or sprayer, be sure to follow the manufacturer’s directions for setup and operation.
After all the cabinetry has been painted, allow it to dry for several days before reattaching the hardware. Be patient; the finish takes a while to cure to a hard, durable surface that is resistant to chips and marks.
Painting cabinets is an excellent way to update a kitchen without the expense and inconvenience of a major remodel. By choosing a professional company like WH Finishing, you can be confident that your finished product will look and feel amazing. Plus, opting for a custom finish instead of purchasing brand new cabinets helps reduce waste and supports sustainable building practices.